Research Requirements
You will be researching your artist and become our resident "experts" on his/her life and works.
Within your groups, you will need to decide who will be the BIO MASTER, VISUAL MASTER, and one or two people will be the CRITIQUE MASTERS.
Here are the basics of what you need:
•Biography
•Media or techniques used by the artist
•Information about style and subject matter
•Names of important works, and their locations
•Photographs of actual works (These must be clear without distortions or being overly pixelated)
We all want to learn about the artist you’ve researched!
•Your group presentation will need to be at least 8 minutes long, and each group member (or MASTER) will be responsible for presenting their research and visual imagery.
•You will be assigned a presentation date. At this time, your head and presentation must be complete.
How you’ll present:
•Create a presentation in Google Slides to be shared with your group and with me.
•All group members must help put together slides (Remember, I can see who contributed what)
•Do not just send all of your research to one person and they put it together.)
•Make your presentation interesting! DO NOT FILL UP AN ENTIRE SLIDE WITH WORDS. •When showing artworks, the title, date, and medium must be on the slide
•You may include an appropriate video if you would like (no more than 2 minutes long in addition to your 8 minutes.)
•You can have as many slides as you would like as long as the minimal amount of information is present.
•Every member of the group must speak during the presentation.
You will also receive an individual grade based on peer evaluations, worth 20 points.
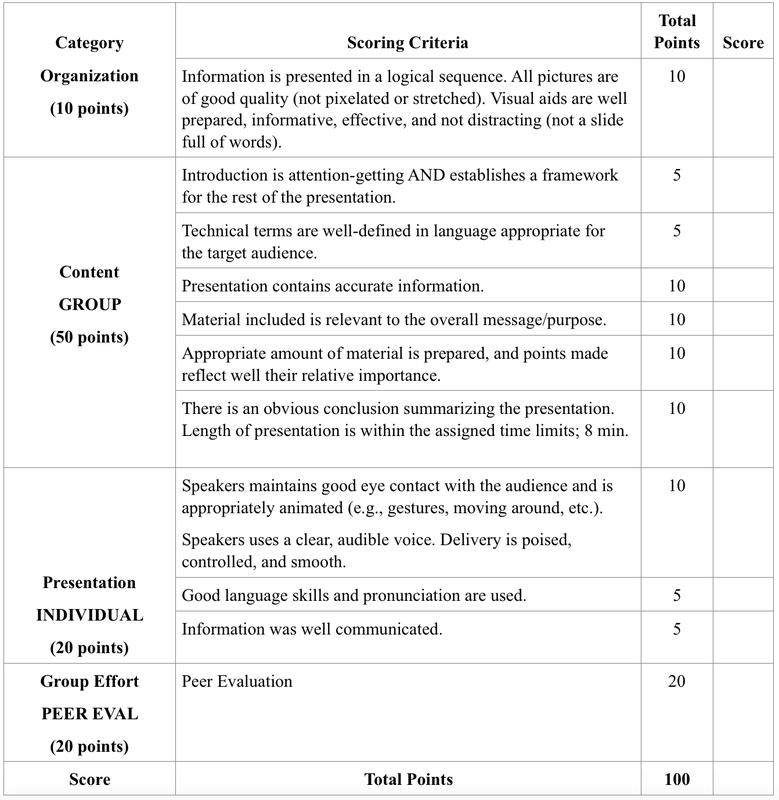
60 possible GROUP points + 40 possible INDIVIDUAL points = 100 points for the presentation ONLY.
Within your groups, you will need to decide who will be the BIO MASTER, VISUAL MASTER, and one or two people will be the CRITIQUE MASTERS.
Here are the basics of what you need:
•Biography
•Media or techniques used by the artist
•Information about style and subject matter
•Names of important works, and their locations
•Photographs of actual works (These must be clear without distortions or being overly pixelated)
We all want to learn about the artist you’ve researched!
•Your group presentation will need to be at least 8 minutes long, and each group member (or MASTER) will be responsible for presenting their research and visual imagery.
•You will be assigned a presentation date. At this time, your head and presentation must be complete.
How you’ll present:
•Create a presentation in Google Slides to be shared with your group and with me.
•All group members must help put together slides (Remember, I can see who contributed what)
•Do not just send all of your research to one person and they put it together.)
•Make your presentation interesting! DO NOT FILL UP AN ENTIRE SLIDE WITH WORDS. •When showing artworks, the title, date, and medium must be on the slide
•You may include an appropriate video if you would like (no more than 2 minutes long in addition to your 8 minutes.)
•You can have as many slides as you would like as long as the minimal amount of information is present.
•Every member of the group must speak during the presentation.
You will also receive an individual grade based on peer evaluations, worth 20 points.
60 possible GROUP points + 40 possible INDIVIDUAL points = 100 points for the presentation ONLY.
PRESENTATION REQUIREMENTS
1. BIOGRAPHY MASTER•Biographical Info:
•Place/date of birth and Place/date of death: •Interesting/Personal information on the artist: •How did they start creating art? •Where did they go to school? Did they go to art school? •Favorite Quote from the artist: •IF they’re still alive, what are they working on now? •IF they’re not alive, what kind of affect did they have on the art world? What is their legacy? 2. VISUAL MASTER•IMAGES (find five of the artist’s works online)
•Portrait or Photograph of artist (find one online) •Date of the works •Medium (i.e., paint, photograph, ceramics or clay, charcoal, etc.) •Sources for each image Primary type of artwork (ex: painting? Drawing? Sculpture? Printmaking? Ceramics) •Media (what materials are use?): •Style or period of art: •Short definition of that style or period: •Social and political context- What was happening in the U.S. and worldwide during the time of your artists’ primary production. |
3. Critique master•Choose one of the 5 pieces of art and answer the following questions:
(IF YOUR GROUP HAS TWO CRITIQUE MASTERS, YOU MUST EACH PRESENT ON AN ARTWORK.) 1. What is the subject matter? 2. Genres. Is this a still life (group of things)? a portrait (a painting, drawing or sculpture of a person)? or a landscape/seascape/cityscape (picture of the land/water/city)? other (explain)? 3. Style/form: Is this artwork realistic (as real as possible)? abstract (distorted reality)? nonobjective (as far from reality as possible)? symbolic? functional? other (explain)? 4. Description. 1. Identify the art elements. 2. Why do you think the artist might have chosen the colors she/he did? 3. Do they make sense? 4. What kind of lines did the artist use? 5. How does the texture add to the work? 5. Interpretation. What do you think the artists was trying to say? Why do you think he/she chose this subject? 6. What feeling does this artwork give you and why? What part of the artwork is your favorite and why? 7. Judgment: Is this work successful? Why or why not. Use your knowledge of the elements of art (line, shape, color, etc.) and the principles of design (movement, balance, rhythm, etc.) to support your argument. |
Presentation TIPS AND TRICKS
1. Nervousness and anxiety:
Everybody has it when they start. There is no magical solution for avoiding it, like thinking of everyone in their underwear. Here are a couple of ideas:
2. The Opening
Generally, it is a good idea to do two things at the outset: try to establish a degree of rapport with the audience and tell the audience what you will cover.
Engaging the audience does not have to be restricted to the opening. There are several ways you can keep the audience actively engaged during your presentation. Again, some examples (just ideas, you don’t have make it complicated) include:
4. Making the Presentation
A basic rule is NOT to read your paper. Deliver your comments in a more conversational presentation style. Create a separate set of notes for your presentation; don't flip through a stapled copy of your paper, especially if it has been graded or marked on. Power Point allows you to download a copy of slides with the ability to write in comments.
Whatever form of notes you use, keep them flat on the podium. Don’t carry them around with you if you move away from the podium.
I also recommend that students use an outline format as the basis for their presentation. With an outline, you list the major points you will talk about, but you don’t write out every word you will say -- the danger being that you might revert to reading it. You work on the specifics in your practice rehearsals.
One approach is to put the main issues or concepts to be discuss as bulleted points on the slide. You then expand on and discuss the bulleted items. Fill the room with your voice and your knowledge.
5. Making an Impression
You should make an effective impression.
STAND: this does not mean standing at rigid attention, but rather staying in one place rather than moving around a lot or pacing back and forth.
STAND: don’t lean or crouch forward on the podium. Don’t sit on the edge of a table or stool. Also, don’t create unnecessary personal distractions, like wearing a hat or sunglasses or constantly having to flip your hair back or pull it behind your ears.
For our purposes at school, business dress – while certainly nice – is not necessary nor expected.
6. Using Visual Aides
There are two main reasons for making in-class presentations: sharing what you have learned with your classmates for their educational benefit, and equipping you to make strong and effective presentations to others in the “real world” when you need to. Look at these presentations as a way to build and improve your skills while inoculating you against the stresses associated therewith.
Good luck!
Everybody has it when they start. There is no magical solution for avoiding it, like thinking of everyone in their underwear. Here are a couple of ideas:
- One important step is to do a good job actually understanding the material you are presenting and organizing it for clear presentation. Last minute and superficial study and preparation of the material will be reflected as uncertainty and doubt in your presentation.
- No doubt one of the best ways to minimize nervousness and anxiety is to practice. Practice in front of a mirror and/or in front of friends or family; ask for feedback. The more you practice, the more comfortable you will be when making the real presentation. Be sure and time your presentation, using an egg timer or some other device to mark off the allotted time; do this with every practice session.
- While you would not necessarily be graded down for nervousness, presentations may be graded poorly when they are poorly organized and carried out.
2. The Opening
Generally, it is a good idea to do two things at the outset: try to establish a degree of rapport with the audience and tell the audience what you will cover.
- It can be a good idea to introduce yourself, especially if the class is large and you don’t know everyone. Another good thing to do is to open with a story or example (by doing this, you can kill the proverbial two birds of rapport and nervousness with one stone). For example, you can use a personal example (something that happened to you or a personal experience) to explain why you selected a topic.
- Another technique that can help you relax in the early part of the presentation is to get the audience involved by asking a question or having them do an activity, like take a test or pose a question. Whatever you do, it should be related to what you are presenting.
- After any opening comments or activities, you should tell the audience what you will cover. This can be a 15 second piece, to the effect that “I’m going to cover three things. First, I’ll talk about .. Then, I’ll review … and I’ll wrap up by ….”
Engaging the audience does not have to be restricted to the opening. There are several ways you can keep the audience actively engaged during your presentation. Again, some examples (just ideas, you don’t have make it complicated) include:
- Asking hypothetical questions
- Taking a show of hands
- Having them take a short test (either handed out or presented on the overhead)
- Asking for them to provide an example from their experience
- Do a demonstration using members of the audience
4. Making the Presentation
A basic rule is NOT to read your paper. Deliver your comments in a more conversational presentation style. Create a separate set of notes for your presentation; don't flip through a stapled copy of your paper, especially if it has been graded or marked on. Power Point allows you to download a copy of slides with the ability to write in comments.
Whatever form of notes you use, keep them flat on the podium. Don’t carry them around with you if you move away from the podium.
I also recommend that students use an outline format as the basis for their presentation. With an outline, you list the major points you will talk about, but you don’t write out every word you will say -- the danger being that you might revert to reading it. You work on the specifics in your practice rehearsals.
One approach is to put the main issues or concepts to be discuss as bulleted points on the slide. You then expand on and discuss the bulleted items. Fill the room with your voice and your knowledge.
5. Making an Impression
You should make an effective impression.
STAND: this does not mean standing at rigid attention, but rather staying in one place rather than moving around a lot or pacing back and forth.
STAND: don’t lean or crouch forward on the podium. Don’t sit on the edge of a table or stool. Also, don’t create unnecessary personal distractions, like wearing a hat or sunglasses or constantly having to flip your hair back or pull it behind your ears.
For our purposes at school, business dress – while certainly nice – is not necessary nor expected.
6. Using Visual Aides
- The slides should be neat, typed and well organized. There should be plenty of "white" or blank space. Crowded slides are difficult to read. We want to see the artist’s artwork! Make sure there is a clear color contrast between the background and the type.
- Avoid using distracting gimmicks, like moving or pulsating objects (unless they are the focal point of the slide).
- Restrain any impulse to use wild or jarring styles or animations. The type should be large (minimum 18 point) and easy to read. If you have not used the technical system at the location, you should plan on getting there early and familiarizing yourself with the system in order to avoid technical glitches.
There are two main reasons for making in-class presentations: sharing what you have learned with your classmates for their educational benefit, and equipping you to make strong and effective presentations to others in the “real world” when you need to. Look at these presentations as a way to build and improve your skills while inoculating you against the stresses associated therewith.
Good luck!